Replacing a single window can cost anywhere from $300 to $1,200—ouch! But here’s the good news: approximately 80% of common window issues can be fixed for under $100 with the right window repair tips. As a fellow homeowner who’s faced drafty windows and foggy panes, I know that sinking feeling when you realize your cozy home might need expensive updates. The U.S. Department of Energy reports that 25-30% of residential heating and cooling energy use is due to heat gain and loss through windows—meaning those seemingly small issues are literally costing you money every month.
The best part? You don’t need to be a professional to tackle most window problems. With some basic tools and know-how, you can dramatically improve your home’s energy efficiency, curb appeal, and comfort without breaking the bank. I’ve personally saved thousands by learning simple DIY window repair techniques instead of jumping straight to replacements. In this guide, I’ll share practical window repair tips that have helped me—and countless other homeowners—fix cracks, drafts, and fogging for a fraction of replacement costs. Whether you’re dealing with a cracked pane or stubborn sashes, these window repair tips will help you save thousands without sacrificing style or performance. Ready to become your home’s window hero? Let’s dive in!
Why Repair Instead of Replace?
Before you start dreaming about shiny new windows, consider this: window repair often makes more financial and environmental sense than full replacement. According to HomeAdvisor, the average cost to repair a window runs between $178 and $635, with most homeowners paying around $405. Compare that to full window replacement, which typically costs $400-$1,200 per window—and suddenly repairs look like a steal.
| Issue | Repair Cost | Replacement Cost | Savings |
|---|---|---|---|
| Cracked pane | $20-$100 | $400+ | 75-95% |
| Foggy double-pane | $100-$200 | $500+ | 70-80% |
| Drafty frame | $50-$150 | $350+ | 85% |
| Stuck sash | $30-$80 | $300+ | 75-90% |
| Rotted sill | $75-$200 | $450+ | 80% |
Beyond the immediate savings, repairing existing windows has significant environmental benefits. Manufacturing new windows requires substantial energy and resources, while repairs extend the life of materials already in use. As argowindowrepair.com points out, replacing too soon can waste budget and resources, while delaying necessary repairs locks in higher bills and potential moisture risks.
For historic homes especially, preserving original windows maintains architectural character while improving performance. Many older windows were built with higher-quality materials than today’s mass-produced options, making restoration a smart investment. Plus, with today’s cheap window fixes, you can achieve near-new performance without losing that authentic charm. Remember, every dollar spent on strategic window repair tips is a dollar not spent on premature replacement—and those savings add up fast.
Assess Your Windows: Common Problems and Quick Diagnostics
Before grabbing your toolbox, take time to properly diagnose your window issues. Most problems fall into five common categories, each with distinct symptoms that help determine whether DIY window repair is feasible:
- Cracks and chips in glass: Visible fractures, spiderweb patterns, or missing shards. Test by holding a credit card against the crack—if it catches, it’s significant enough to address.
- Foggy or cloudy double-pane windows: Condensation trapped between panes that doesn’t clear after wiping. This indicates failed seals—check by looking for water droplets that persist through temperature changes.
- Drafts around frames: Feel for air movement with your hand or hold a lit candle near seams (safely!). Drafts often accompany peeling paint or visible gaps in caulking.
- Stuck or difficult sashes: Windows that won’t open/close smoothly, or require excessive force. Check for paint buildup, warped frames, or damaged tracks.
- Rotting wood components: Soft, crumbly areas on sills or frames, often with discoloration. Press gently with a screwdriver—if it penetrates easily, you’ve got rot.
Today’s Homeowner notes that for windows less than 20 years old with isolated issues, replacing just the problematic component is often the most cost-effective solution. However, if multiple issues compound or the frame shows structural damage, replacement might be necessary. The key is identifying which window repair tips apply to your specific situation before investing time and money.
Essential Tools and Materials for DIY Window Repairs
You don’t need a professional workshop to tackle most window repairs. Here’s your affordable starter kit (total cost: approximately $75):
- Putty knife ($5-10 at Home Depot): For scraping old caulk and paint
- Caulk gun ($8-15 at Lowe’s): Essential for applying sealants
- High-quality exterior caulk ($5/tube at Amazon): Look for silicone or polyurethane
- Glazing compound ($7 at hardware stores): For glass repairs
- Epoxy resin kit ($12 online): Fixes small glass cracks
- Weatherstripping ($10 for 20ft roll): Various types available at Walmart
- Fine-grit sandpaper ($3 for 6-pack): Prepares surfaces for repairs
- Wood filler ($6 for 16oz): Repairs minor rot in wooden frames
- Replacement sash cords ($4 for spool): For older double-hung windows
- Safety glasses and gloves ($15): Non-negotiable protection
Insert photo of organized tool kit for window repairs with labeled items
Most items can be purchased at your local hardware store or ordered online for next-day delivery. Keep this kit in a dedicated container so it’s ready when issues arise. With these basics, you’ll be equipped to handle 90% of common problems using window repair tips that save you professional service calls. Remember: investing $75 in tools now could prevent $500+ in unnecessary replacements later!
Top 10 Window Repair Tips to Save Big
1. Fix Cracks in Glass with Epoxy Resin
Small cracks (under 6 inches) in single-pane windows can often be repaired for under $20 instead of replacing the entire pane. Safety first: Wear thick gloves and eye protection when handling broken glass.
- Clean the crack thoroughly with rubbing alcohol
- Mix the epoxy resin according to package instructions
- Apply with the included applicator, filling the crack completely
- Press plastic wrap over the repair to create a smooth surface
- Allow 24 hours to cure before removing the wrap
Pro tip: For larger cracks, apply masking tape to both sides before epoxy application to prevent spreading. This DIY window repair costs about $15 versus $100+ for professional glass replacement. Common mistake: Rushing the curing process—patience ensures clarity. When to call a pro: If the crack is near the edge or longer than 12 inches, replacement is safer.
2. Recaulk Drafts Around Frames
Drafty windows waste energy and comfort. Recaulking costs under $10 and takes 20 minutes per window.
- Remove old, cracked caulk with a utility knife
- Clean the area thoroughly with rubbing alcohol
- Apply painter’s tape along both sides of the seam
- Load new caulk into gun and apply steady bead
- Smooth with a wet finger or caulk tool
- Remove tape before caulk dries
Pro tip: Use paintable silicone caulk for best results—it lasts 20+ years. Ecoline Windows notes that resealing windows properly can cost about $50 for a pro, but just the materials if you DIY. Common mistake: Applying caulk to dirty surfaces—this guarantees early failure. When to call a pro: If the frame is severely deteriorated, structural repairs may be needed first.
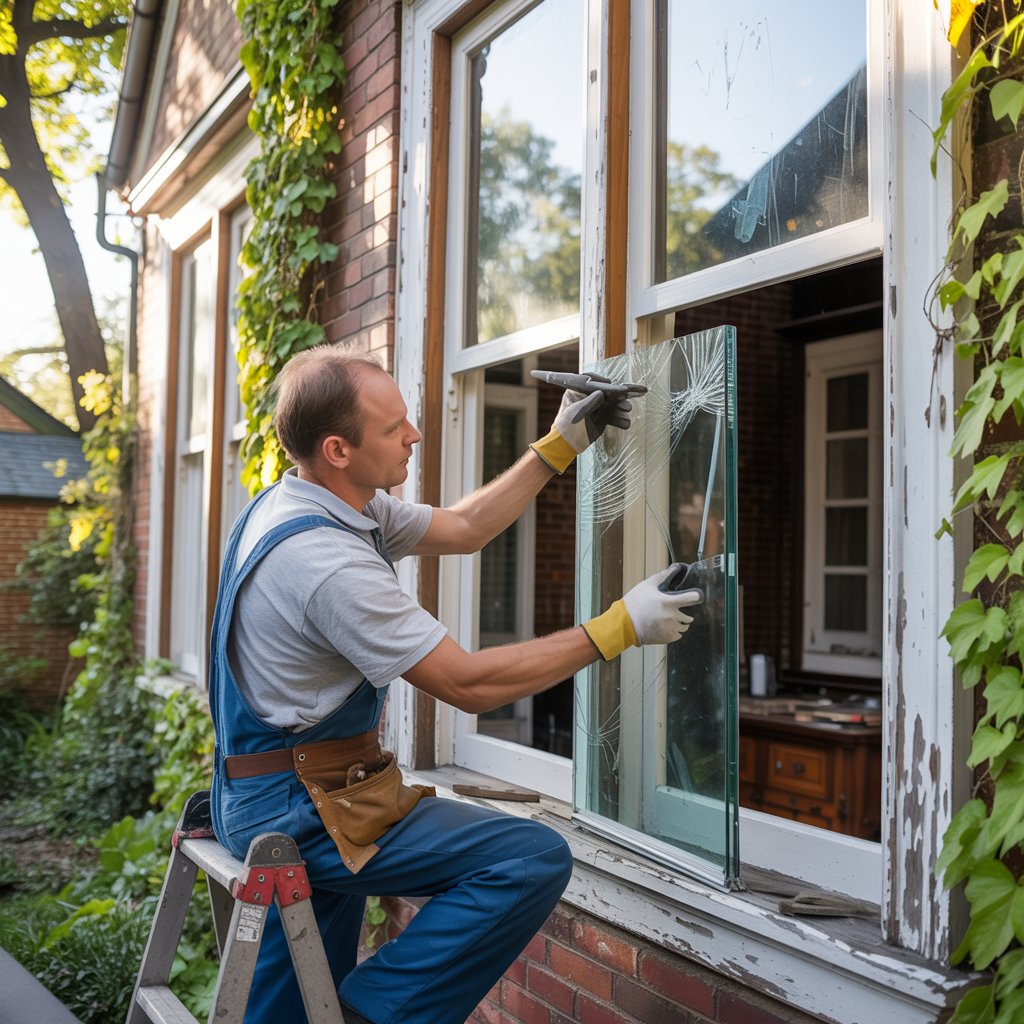
3. Replace Foggy Double-Pane Seals
Foggy windows don’t always mean full replacement. You can often replace just the insulated glass unit (IGU).
- Remove the window sash from its frame
- Carefully disassemble the sash to access the glass unit
- Measure the exact dimensions of the IGU
- Order a replacement from a glass shop (typically $80-$150)
- Install new unit with glazing points and compound
- Reassemble and reinstall the sash
Pro tip: Take a photo of your existing IGU to the glass shop—they can match the Low-E coating and gas fill. This window repair tip saves $300+ versus full window replacement. Common mistake: Forcing the sash out—work slowly to avoid damaging the frame. When to call a pro: If the frame is damaged or you’re uncomfortable handling glass.
4. Lubricate and Unstick Sashes
Stuck windows are often just dirty or dry in the tracks.
- Remove the sash by lifting and tilting (for double-hung)
- Clean tracks thoroughly with soapy water and toothbrush
- Sand any paint buildup in the channels
- Apply silicone-based lubricant to all contact points
- Reinstall sash and test movement
- Add weatherstripping if needed for smooth operation
Pro tip: Use a bar of soap on the sash edges for instant lubrication in a pinch. This cheap window fix costs virtually nothing versus $100+ for professional service. Common mistake: Using oil-based lubricants—they attract dirt. When to call a pro: If the sash is warped or the frame is damaged.
5. Repair Rotting Wood Sills
Soft, crumbly wood doesn’t always mean replacement—minor rot can be patched.
- Remove all rotted material with a chisel
- Treat the area with wood hardener
- Fill with two-part epoxy wood filler
- Shape to match original contour while wet
- Sand smooth when cured
- Prime and paint for protection
Pro tip: For deeper rot, drill small holes and inject liquid epoxy before filling. This window repair tip costs $20 versus $200+ for professional sill replacement. Common mistake: Not removing all rotted material—this leads to recurring problems. When to call a pro: If structural integrity is compromised or rot extends into the frame.
6. Tighten Loose Hardware
Wobbly windows waste energy and security.
- Identify all loose hinges, latches, and locks
- Remove old screws (often stripped)
- Fill screw holes with wooden matchsticks dipped in glue
- Allow 1 hour for glue to set
- Reinstall hardware with slightly longer screws
- Test operation and adjust as needed
Pro tip: Use deck screws for better grip in soft wood. This DIY window repair costs nothing if you have basic tools versus $75+ for professional tightening. Common mistake: Forcing stripped screws tighter—they’ll just spin more. When to call a pro: If the hardware mounting area is completely deteriorated.
7. Clean and Restore Foggy Windows
Before replacing, try this trick for mild interior condensation.
- Drill two small holes (1/8″) at top and bottom of IGU
- Insert flexible tube into bottom hole
- Blow isopropyl alcohol through the unit
- Allow to dry completely (24-48 hours)
- Seal holes with clear silicone
Pro tip: Add a desiccant packet through the top hole before sealing for longer-lasting results. This how to repair foggy windows without replacing method costs $10 versus $150+ for professional service. Common mistake: Using too much alcohol—it can leave residue. When to call a pro: If the glass is cracked or the spacer bar is damaged.
8. Seal Gaps with Weatherstripping
Drafts around moving parts waste significant energy.
- Identify air leaks with incense or tissue test
- Choose appropriate weatherstripping type (V-strip, foam tape, etc.)
- Clean and dry surfaces thoroughly
- Measure and cut weatherstripping to size
- Apply with strong adhesive
- Test window operation and adjust as needed
Pro tip: For double-hung windows, install compression weatherstripping on the meeting rail. This affordable vinyl window repair costs $15 versus $100+ for professional installation. Common mistake: Applying to dirty surfaces—clean with alcohol first. When to call a pro: If the window frame is significantly out of square.
9. Patch Vinyl Window Bends
Warped vinyl frames can often be straightened.
- Remove sash to access the frame
- Heat the bent area with a hairdryer (low setting)
- Gently bend back into position using clamps
- Hold in place until cooled
- Reinforce with aluminum angle brackets if needed
- Reinstall sash and test
Pro tip: Work slowly—vinyl becomes brittle if overheated. This window repair tip costs $5 for brackets versus $300+ for frame replacement. Common mistake: Applying too much force—vinyl cracks easily when cold. When to call a pro: If the frame is cracked or severely warped.
10. Upgrade Insulation Without Full Replacement
Boost efficiency without replacing windows.
- Apply removable window film kits in winter
- Install interior storm windows
- Add magnetic insulating panels for extreme cold
- Use thermal curtains with proper installation
- Apply removable caulk around interior frames seasonally
- Install exterior awnings to reduce summer heat gain
Pro tip: argowindowrepair.com notes that proper window film can reduce heat loss by up to 50%. These window repair tips cost $20-$100 versus $500+ per window for replacement. Common mistake: Poor film application—follow instructions precisely for bubble-free results. When to call a pro: If you need custom interior storm windows.
Advanced Tips for Energy Efficiency and Longevity
Take your window performance to the next level with these pro-level strategies:
- Apply low-emissivity (Low-E) window film ($20-$50 per window): This virtually invisible coating reflects infrared heat while allowing light through, reducing heat transfer by up to 30%. Look for products with at least 70% visible light transmission for best results.
- Install interior storm windows ($100-$200 per window): Removable acrylic panels create an insulating air gap without altering your existing windows. They’re especially valuable for historic homes where preservation matters.
- Seasonal maintenance schedule:
- Spring: Inspect and recaulk exterior seals
- Summer: Clean tracks and lubricate moving parts
- Fall: Apply interior weatherstripping and storm protection
- Winter: Check for ice dams and interior condensation
These advanced window repair tips can boost your windows’ energy efficiency rating significantly, potentially qualifying you for IRS §25C tax credits if you eventually do need replacements. Remember, well-maintained windows can last decades beyond their expected lifespan—saving you money while reducing environmental impact.
When to Bite the Bullet and Replace
While window repair tips can solve most issues, some situations warrant replacement:
- Structural frame damage that compromises window integrity
- Multiple failed seals across several panes
- Severe rot affecting more than 50% of the frame
- Inoperable hardware with no replacement parts available
- Single-pane windows in extreme climates (consider energy-efficient upgrades)
If replacement is necessary, look for ENERGY STAR-certified windows with U-factors below 0.30 for cold climates. Many manufacturers offer “full-frame” replacement options that fit within existing openings, reducing installation costs by 30-40%. Don’t forget to check for 2025 window tax credits which can cover up to 30% of qualified energy-efficient window costs.
Conclusion
You’ve just discovered how strategic window repair tips can save you thousands while improving your home’s comfort and efficiency. Remember these three key takeaways: 1) Most common window issues cost under $100 to fix versus $400+ for replacement, 2) Proper maintenance extends window life by decades, and 3) Small fixes add up to significant energy savings—potentially 15% on HVAC costs according to the National Renewable Energy Laboratory.
Don’t wait for that drafty window to become a major problem. Pick one window repair tip from this guide and tackle it this weekend—you’ll be amazed at the immediate improvement in comfort and your next utility bill. I started with simple recaulking and saved $200 on my first window fix, and now I confidently handle most issues myself.