There’s nothing quite as frustrating as pulling out of the garage and spotting a dark, greasy puddle on your freshly swept driveway. Oil stains are one of the most common — and most stubborn — eyesores US homeowners deal with, and they’re more than just a cosmetic problem. Left untreated, motor oil, transmission fluid, and power-steering leaks slowly break down the binder in asphalt and eat into the pores of concrete, shortening the life of the surface you paid thousands of dollars to install.
The good news? Almost every oil stain can be dramatically improved — and many removed entirely — with the right approach. Whether you grabbed a bag of cat litter five minutes ago or you’re staring at a five-year-old mystery spot, this guide walks you through driveway cleaning oil stains step by step. You’ll learn quick first-aid tactics, six proven DIY methods ranked by stain severity, when it’s smarter to call a pro, and how to keep your driveway looking clean for years.
What Causes Oil Stains and Why They Set
Most residential oil stains come from the same handful of culprits: a leaky oil pan gasket, a dripping rear main seal, overfilled power-steering reservoirs, or the occasional spilled quart during a weekend oil change. Asphalt driveways are especially vulnerable because asphalt is petroleum-based — fresh motor oil literally dissolves the binder that holds the aggregate together, which is why old oil spots on asphalt often turn into crumbly divots over time. Concrete isn’t immune either. Its microscopic pore structure acts like a sponge, wicking oil deep below the surface within hours of a spill and locking it in over days and weeks.
Three factors decide how tough a stain will be:
- Time — fresh oil sits on top; old oil penetrates.
- Temperature — hot summer sun thins oil and drives it deeper.
- Surface type — unsealed concrete and aged asphalt absorb the fastest; sealed surfaces, pavers, and brick resist longer but require gentler cleaning methods.
Understanding these variables is the key to choosing the right method below.
First Steps for Fresh Oil Spills (Absorb, Blot, Avoid Spreading)
If the spill is still wet, don’t reach for the hose. Water spreads oil and pushes it deeper. Instead, act within the first 30 minutes:
- Cover generously with an absorbent — clay cat litter, sawdust, baking soda, or a commercial oil absorbent.
- Press, don’t scrub. Use your shoe or a flat board to tamp the material into the oil.
- Let it sit for at least 30 minutes (overnight is better).
- Sweep it up with a stiff broom and dustpan, and dispose of it in a sealed bag — never in a storm drain.
This single step can remove 60–80% of a fresh spill before it ever has a chance to set.
DIY Method 1: Using Absorbents
Best for: Fresh or slightly set spills on concrete, asphalt, pavers, and brick.
Materials
- Clay-based cat litter (unscented, non-clumping), sawdust, or baking soda
- Stiff-bristle broom
- Dustpan and heavy-duty trash bag
- Nitrile gloves
How-to
- Mound the absorbent ½ inch thick over the stain, extending an inch past the edges.
- Crush larger granules with your boot to increase surface contact.
- Let sit 2–12 hours depending on spill size.
- Sweep up, reapply once more if the spot is still damp, then rinse lightly.
Time: 15 minutes active + dwell time
Expected results: Near-complete removal on fresh spills; 30–50% improvement on week-old stains.
Pros: Cheap, safe, works on every surface.
Cons: Won’t touch stains older than a few weeks on their own.
DIY Method 2: Dish Soap and Hot Water Scrubbing
Best for: Light, recent stains on sealed concrete and pavers.
Dish soap (Dawn is the classic choice) is a surfactant — it breaks the bond between oil molecules and the driveway surface so water can carry them away.
How-to
- Squirt a generous line of liquid dish soap directly onto the stain.
- Add a splash of very hot water (not boiling — 140–160°F is ideal).
- Scrub aggressively with a stiff nylon brush for 3–5 minutes.
- Let the soap dwell for 10–15 minutes, rewetting if it starts to dry.
- Rinse with a strong stream from your garden hose.
- Repeat if a shadow remains.
Time: ~25 minutes
Expected results: Excellent on fresh stains, fair on older ones.
Pros: You already have the ingredients.
Cons: Labor-intensive; not strong enough for deep-set spots.
DIY Method 3: Poultices for Deep Stains
Best for: Old, dark, or repeatedly failed stains on concrete.
A poultice is essentially a slow-acting absorbent paste that draws oil back out of the pores as it dries. This is the single most effective DIY tool for concrete oil stain removal.
Materials
- Baking soda, diatomaceous earth, powdered laundry detergent, or a commercial poultice (e.g., Oil-Eater, Prosoco)
- Water or acetone (acetone works better on old stains — use outdoors with ventilation)
- Plastic sheeting and painter’s tape
- Putty knife
How-to
- Mix the powder with liquid to a peanut-butter consistency.
- Trowel it on ¼–½ inch thick, overlapping the stain by an inch.
- Cover with plastic, tape the edges, and poke a few small vent holes.
- Let it dry completely — typically 24–48 hours.
- Scrape off the hardened poultice and rinse.
Time: 30 minutes active + 24–48 hours dwell
Expected results: 60–90% improvement on stains up to several years old.
Pros: Works where scrubbing fails; safe on most surfaces.
Cons: Slow; may need 2–3 applications for deep stains.
Real-world example: A suburban homeowner in Ohio removed a two-year-old motor-oil stain by applying a clay-based poultice, letting it dry for 48 hours, then pressure-washing at 2,500 PSI — achieving roughly 90% improvement after one treatment. Some older stains may still need a second round or, in extreme cases, resurfacing.
DIY Method 4: Commercial Degreasers — What to Look For
Best for: Medium-aged stains and general driveway grime.
When you’re shopping for the best cleaner for oil stains on concrete, look for products labeled as concrete degreasers or driveway cleaners with active ingredients like d-Limonene (citrus-based), sodium metasilicate, or potassium hydroxide. Biodegradable, eco-friendly driveway cleaners are now widely available and perform nearly as well as caustic formulas without the environmental risk.
How-to
- Pre-wet the surrounding area to prevent accidental bleaching or etching.
- Apply degreaser full-strength to the stain.
- Agitate with a brush and let dwell 5–15 minutes (follow the label — longer is not always better).
- Rinse thoroughly.
Expected results: Strong on 1–6-month-old stains; pair with a poultice for older ones.
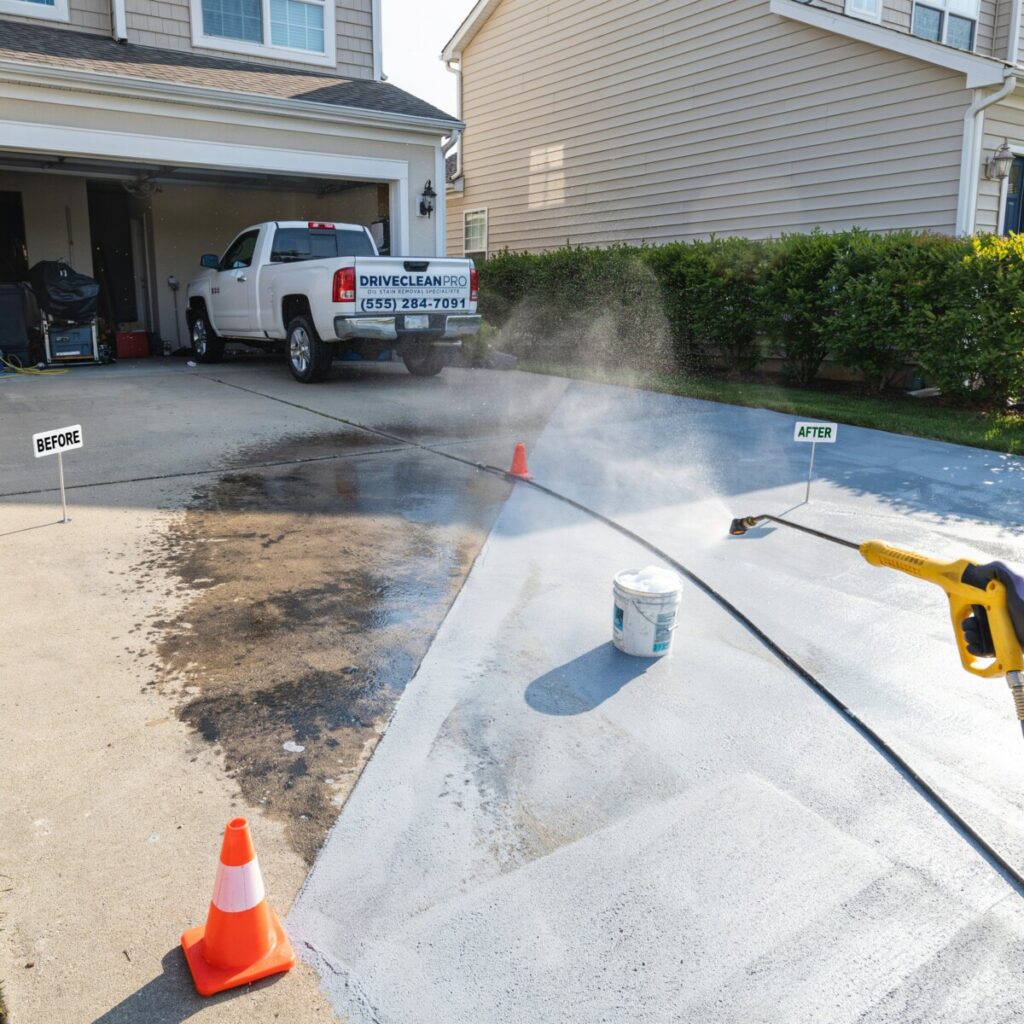
DIY Method 5: Pressure Washing Safely and Effectively
Best for: Finishing a chemical treatment or cleaning large, lightly stained areas.
Pressure washing alone rarely removes oil — it mostly spreads it. It shines as the rinsing step after a degreaser or poultice.
Safe PSI ranges
| Surface | Recommended PSI |
|---|---|
| Poured concrete | 2,000–3,000 PSI |
| Stamped concrete | 1,500–2,000 PSI |
| Asphalt | 1,500–2,000 PSI (high pressure can gouge) |
| Pavers / brick | 1,200–1,800 PSI |
Tips
- Use a 25° or 40° fan-tip nozzle, never a zero-degree (red) tip.
- Keep the wand 12–18 inches from the surface and moving.
- A surface-cleaner attachment gives far more even results than a wand alone.
DIY Method 6: Combining Poultice and Pressure Wash for Stubborn Stains
This is the gold-standard DIY sequence for driveway oil stain removal on old, black, set-in spots:
- Pre-clean with degreaser and a stiff brush.
- Apply a poultice and let it dry 24–48 hours.
- Scrape off the poultice.
- Apply a second round of degreaser and let dwell 10 minutes.
- Finish with a pressure washer at the appropriate PSI for your surface.
Expect 70–95% improvement on stains that nothing else has touched. Two full cycles may be needed on multi-year-old stains.
When to Hire a Professional
DIY works beautifully for most stains, but call in a pro if:
- The stain is larger than a dinner plate or there are multiple leaks.
- The asphalt is softening, crumbling, or depressions are forming.
- You’ve tried two DIY cycles with little improvement.
- The driveway is stamped, stained, or coated and you don’t want to risk etching.
What pros do differently:
- Hot-water pressure washing (180–200°F) dissolves oil far better than cold water.
- Truck-mounted units deliver sustained high GPM and PSI that consumer machines can’t match.
- Industrial solvent poultices and surface etching for the most stubborn cases.
- Spot sealing or patching of damaged asphalt.
Ballpark costs (US averages):
- Spot cleaning a single stain: $75–$175
- Full driveway degreasing and wash: $150–$400
- Asphalt patching + sealing: $200–$600+
Questions to ask before hiring:
- Are you insured, and do you carry pollution liability?
- Do you use hot-water equipment?
- How do you handle runoff and wastewater?
- Do you offer sealing as part of the service?
- Can you show before-and-after photos of similar jobs?
Prices vary by region — expect the higher end in the Northeast and West Coast, lower in the Midwest and South.
Preventing Future Stains
The cheapest oil stain is the one that never happens.
- Seal the driveway. A quality penetrating or film-forming sealer dramatically slows oil absorption. Typical sealer lifespan is 2–5 years depending on traffic and climate — reseal on schedule. (See our Concrete Sealing and Maintenance guide.)
- Use drip pans or parking mats. A $30 absorbent mat under the engine bay catches leaks before they reach the surface.
- Fix leaks early. A rear-main-seal leak that costs $20 in oil per month can cause $500 in driveway damage over a year.
- Park differently. If the car always drips in the same spot, install a gravel or permeable-paver parking pad in that zone.
- Seasonal maintenance:
- Northeast / Midwest: Seal in early fall before freeze-thaw cycles open pores.
- South / Southwest: Seal in spring; summer heat accelerates sealer breakdown.
- Pacific Northwest: Clean moss and debris quarterly — trapped moisture holds oil against the surface.
Environmental and Safety Tips
Oil-laden runoff is a major source of stormwater pollution — it flows straight into creeks and rivers in most US municipalities.
- Never rinse oil into a storm drain. Berm the area with absorbent socks and direct rinse water onto grass or into a sanitary drain where local codes allow.
- Dispose of used absorbents at a household hazardous waste facility; most counties accept them free of charge.
- Wear PPE: nitrile gloves, eye protection, and an N95 or P100 mask when handling dry poultice powders or solvents.
- Choose eco-friendly degreasers with EPA Safer Choice or similar certifications when possible.
Conclusion and Next Steps
Removing oil stains from a driveway is rarely a one-and-done task — it’s a progression. Start with absorbents and dish soap for fresh spills, graduate to poultices and degreasers for older stains, and bring in pressure washing (or a professional) when the stain has been around the block a few times. Pair every cleaning with a good sealer, and most homeowners will never see the same spot twice.
If your driveway has seen better days, don’t wait for the next leak to make it worse. Download our free Driveway Cleaning Checklist, or schedule a no-obligation quote with a local pro — a 20-minute visit can save you thousands in premature resurfacing.